Upload PDFs Tab
(Only Available as part of the Comprehensive tax Kiosk configuration)
The Upload PDFs tab is used to transfer the PDFs you created of the tax bills to your Tax Kiosk, making them available to be viewed and/or printed. This process cannot be completed until tax bills have been created and PDFs have been saved to a file. (See Creating PDF Invoices for Paperless Notification )
To upload the PDFs from the Tax Collect program select Utilities | Internet Kiosk | Upload Data to Kiosk and select the Upload PDFs tab.
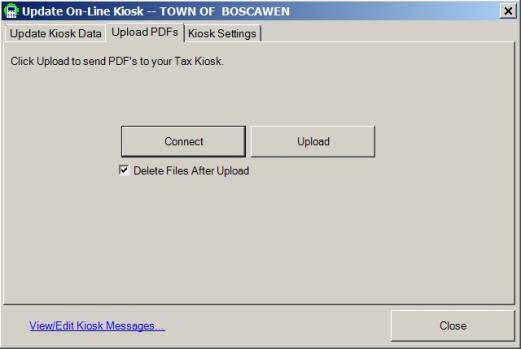
Press the Connect button. This will enable the Upload button, which will allow you to transfer the PDFs to the Tax Kiosk. The Delete Files After Upload checkbox is used to delete the PDFs in the file after the upload to the kiosk is complete. However, if the upload process fails, you will have to create the PDFs again before proceeding. If you do not select this option, the PDFs will remain in the folder until you manually delete them. Press the Upload button to begin the process.
This process should be used as a guideline, and not as a replacement for understanding the process.
Note: This process could take a long time (even a half hour or more).
-
Confirm the folder PDFs to Kiosk on your desktop is empty.
-
Utilities | Print Tax Bills | INCLUDE EXEMPT INVOICES (for uniformity), and select Next.
-
Confirm Tax Collector information (including any Custom Message(s)), then select Next.
-
Choose DO NOT INCLUDE OTHER AMOUNTS, as the amount due on the PDF invoice should match what is on the tax kiosk, and select Next.
-
Below the grid, select the radio button: Generate PDF Invoices To Tax Kiosk.
-
Confirm the path the PDFs will export to.
-
Choose the Print Date using the Date Picker dropdown.
-
Select Create.
-
Utilities | Internet Kiosk | Upload Data to Kiosk
-
Update Kiosk
NOTE: You must update your kiosk before uploading your PDFs, as the PDFs will need an invoice to "attach to".
-
Utilities | Internet Kiosk | Upload Data to Kiosk
-
Select the Upload PDFs tab:
-
Select the Connect button.
-
Delete Files After Upload checkbox (Collector's choice):
-
Checking this box causes the PDF files to be deleted as soon as upload is complete.
-
If there is a hiccup in the upload process, causing the files to not fully upload, and you have checked this box, the files will be deleted immediately, and you will need to begin the generating PDFs process again.
-
-
By not checking this box, the files do not auto-delete.
-
Confirm the upload was successful by checking the kiosk the following day.
-
Then go into the PDFs for Kiosk folder, DELETE files.
-
-
-
Select the Upload button.
-
-
Once Upload is complete, select Close.
-
Our PDF uploader runs overnight, so bills will display online the next day.